React Native or Flutter? A Brief Guide to Choose the Best Framework!

React Native or Flutter? A Brief Guide to Choose the Best Framework!
React Native app development company
React Native or Flutter?
Which cross-platform development framework to pick for my upcoming app development project?
Which one will aptly fit into my business objectives & operational requirements?
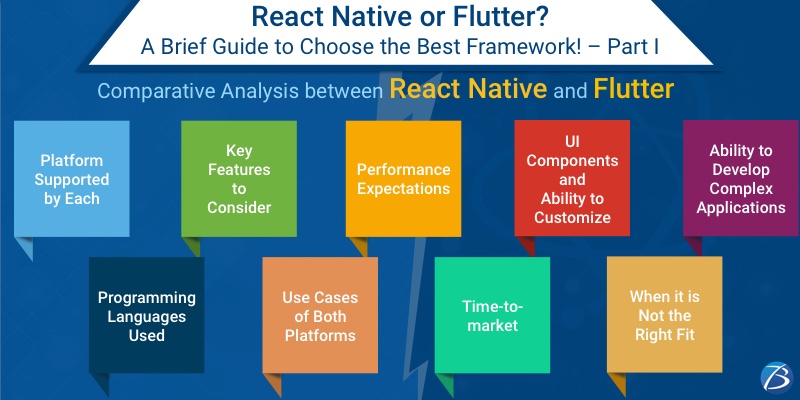
Well, if such questions arise in your mind, this post is for you. Here, we will carry out a comparative analysis between React Native and Flutter based on certain crucial factors. It will provide clear visibility to entrepreneurs about the strengths and weaknesses of these leading frameworks. So, let’s quickly get started.

Comparative Analysis: React Native App Development Vs. Flutter App Development

React Native App Development

Introduction in a Nutshell

React Native:

  • React Native was officially released in March 2015 and its latest version is 0.69.
  • React Native is a framework employed for creating native-like applications.
  • This free and open-source framework is developed by Facebook.
  • React Native App Development has been leveraged by giants like Facebook, Skype, Tesla, Instagram, Pinterest, Bloomberg, Wix, SoundCloud, etc.

Flutter:

  • Flutter was developed by Google in Dec 2018 and its latest version is Flutter 3.
  • It is a portable UI toolkit employed for the creation of natively-compiled applications across mobile, desktop, and the web.
  • This too is a free and open-source platform.
  • Flutter app development has been leveraged by Google for creating the Google Ads app, by Alibaba for developing the Xianyu app, by Hamilton Musical for crafting the Hamilton app, and also by eBay, BMW, Square, etc.

Platform Supported by React Native & Flutter

React Native:

Android, iOS, Mac, Linux, Google Fuchsia, and Windows.

Flutter:

Android, Android TV, Windows, iOS, tvOS, and macOS.

Key Features to Consider

React Native:

  • Code-sharing
  • Fast-refresh property
  • Modular and intuitive architecture
  • Support to NPM libraries
  • Better Accessibility
  • Support to CocoaPods
  • UI-focused design
  • Strong community to support
  • Stable, tried, and tested

Flutter:

  • Code-sharing
  • Hot-reloading
  • High-level customization possible
  • Has its own rendering engine
  • Easy access to Native features and SDK- Software Development Kit
  • Growing community to support
  • Scalable and Flexible
  • Good Widget Library
  • Huge support for automated testing

Performance Expectations

React Native:

Comparatively, React Native is less performant than Flutter. The use of JavaScript Bridge for communicating between native modules and the involvement of third-party libraries results in lower performance in React Native development projects. For improving performance, one can make use of third-party libraries like Proguard which optimize the bytecodes further. Besides, elements like Slowlog can also be utilized for setting performance timers for tracking performance issues and resolving them.

Flutter:

Flutter, by default, has native modules available and so, it doesn’t need a bridge for communicating between the native modules. The Skia graphics library is used during Flutter app development which enables the UI to be redrawn every time with every single change in the app view. Consequently, even at 60 FPS, Flutter performs much more efficiently.

UI Components and Ability to Customize

React Native:

React Native comes with just a few basic but outstanding components that are adaptive to a platform, like a slider, button, or loading indicator. However, there are plenty of 3rd party components available in this framework; but using them requires extra effort and time from React Native & React Developers.

Flutter:

Flutter comes with its own set of rich customizable widgets that are rendered and managed by the graphics engine of the Flutter Framework. It supports Material Design and also saves time. This imparts a great look and feel to the apps.

Ability to Develop Complex Applications

React Native:

React Native is suitable for building complex applications including gaming apps. But this process involves using JavaScript along with the utilization of some native development skills.

Flutter:

As of now, Flutter isn’t suitable for handling complicated projects. But since it is a good choice for MVP development, it’s a great option for startups to pick Flutter app development.

Programming Languages Used and Availability of Developers

React Native:

React Native makes use of JavaScript for building software applications. JavaScript, being one the most extensively used programming languages, is familiar to a host of developers. Consequently, React Native developers are readily available for varying project requirements.

Flutter:

Flutter makes use of Dart language which is a client-optimized language as per Google. Dart is quite easy to learn and use, however, it isn’t that popular in the developer community as this language is newer in comparison to React Native. Hence, it is a challenging task to hire Flutter app developers who are highly skilled.

Use Cases of Both Platforms

React Native:

  • Applications with simplified UI
  • Simple cross-platform applications
  • Applications with reusable components
  • Applications that work with synchronous APIs
  • Quick prototype apps
  • Applications that have close to native appearance and performance with responsive UX using FlexBox

Flutter:

  • MVP apps
  • Applications that function with OS-level features
  • High-performant applications with Skia rendering engine
  • Applications with material design
  • Applications having vast data integration
  • Flexible UI with high-level widgets

Time-to-market

React Native:

The time-to-market is much faster when compared to native app development. However, since it utilizes native elements and bridges, it may make the React Native mobile app development process a bit longer.

Flutter:

Similar to React Native, Flutter too, is faster when compared to native app development.

When it is Not the Right Fit?

React Native:

  • When your app needs custom communication via Bluetooth, it can be tricky to implement if it’s an end-product of React Native development.
  • When your application needs to handle some uncommon or specific tasks like calculations in the background, React Native may not be the best pick.

Flutter:

  • When your application needs multiple interactions with an OS or needs to use less popular native libraries, Flutter is not a good option to opt for.
  • When you want an app that supports 3D Touch; Flutter is not apt as it does not support 3D.
  • When you require a minimalistic UI, but significantly depend on the usage of the phone hardware, Flutter may not be the right pick.

Wrap-Up:

In this post, we have discussed several parameters and compared the frameworks React Native and Flutter based on those parameters. Check out the 2nd part of this blog here.
Both of these frameworks are quite popular, and so, we cannot conclude that one of them is better than the other. The choice of frameworks solely depends on the end goals of your project. These parameters will provide you a clear idea and help you decide whether to partner with a React Native App Development Company in USA or a Flutter App Development Company for your project.
I hope this was an insightful read and will help you make an informed decision while choosing any of these aforesaid frameworks.

An Overview of Stripe Payment Processing in React Native Apps!

An Overview of Stripe Payment Processing in React Native Apps!
React Native app development company
One of the vital segments of React Native development is the payment integration process and this blog is all about Stripe integration into a React Native app.
Making online payments through the web or mobile apps is a common practice today. As a result, millions of apps have the payment processing feature embedded in them. Various payment gateways like PayPal, Braintree, Stripe, Expo, RazorPay, AWS Amplify, etc. are used for this purpose. Out of these, Stripe is one of the most widely used and fastest-growing gateways. Stripe Payment Services is also being extensively used in a diverse range of React Native apps and is a preferred choice of several React Native Service providers around the world.
This post provides insights on what Stripe is, its working mechanism, and the step-by-step methodology to integrate it into the React Native applications.

What Is Stripe?

Stripe is a popular payment gateway or a payment processing platform founded in 2010. It is used by individuals or businesses whether small or large, for accepting payments via credit and debit cards, recurring payments used for subscriptions, sending payouts, and also processing automated clearing house (ACH) transactions. It also serves as a third-party payment processor and supports various payment methods such as Google Pay, Apple Pay, Masterpass by Mastercard, Wechat Pay, Microsoft Pay, etc.
Stripe can be effortlessly integrated due to the availability of easy-to-use APIs. Also, it provides the facility of banking, prevention from frauds, technical infrastructure, etc. that is needed for operating the on line payment systems. A large number of eCommerce solutions are using Stripe. Currently, Stripe powers the payment processing for some of the well-known global brands including Lyft, Pinterest, Blue Apron, Under Armour, etc.

Working Mechanism Of Stripe In React Native Apps

Below pictorial representation shows how Stripe works in React Native apps.
react native development
  • A payment is initiated in the front end of a React Native app. Details like card number, expiry date, CVV, etc. are sent to Stripe.
  • In case of valid details, a token is sent by the Stripe server to the app.
  • After the app receives this token, the payment information along with token information has to be sent to the app’s backend server. The backend server will communicate with the server of Stripe along with the token and payment details.
  • After successful completion of payment, Stripe sends the transaction response to the backend server.
  • Thereafter, the backend server sends the payment success response to the app.

Stripe And React Native Development

React Native app developers can implement Stripe in a React Native app’s frontend in the following ways as mentioned below:
  • Integrating the Stripe SDK for Android or iOS
  • Using a 3rd party library like Tipsi-stripe
Both of these methods have their share of pros and cons. The Tipsi-stripe library can be easily implemented and works smoothly. But as of now, Stripe has not ‘publicly’ approved the React Native library from Tipsi. But Stripe’s SDK’s is considered a smarter choice when one is looking for maximum compliance in a production environment.

How To Implement Stripe?

react native developers
Note: Here we have considered the Tipsi-stripe library for integration of Stripe. Also, version 0.60 of React Native was used. Also, we considered a Firebase server for the backend part.

Step 1: Creation Of Stripe Developer Account And Getting The API Keys

For creating the account, visit Stripe.com. Note that the services provided by Stripe are limited to certain countries. After account creation and registration, you will land in the Stripe Dashboard. Then go to Developer Tab > API keys for accessing the keys. Ensure that for viewing the ‘Test Data,’ you switch ON the toggle. All the development tasks must be carried out using ‘Test Data’.
The ‘Publishable key’ is used to connect the React Native app with the Stripe Native SDK or Tipsi-stripe library. This key is used for generating a token. The ‘Secret key’ is used in the backend for the actual payment processing, where your server makes a connection with the Stripe server using this secret key. After testing the process, you may toggle to ‘Live keys.’

Step 2: Development Of A React Native App For Integrating Stripe

For developing a basic app, ensure that you are equipped with all the pre-requisites pertaining to the React Native framework’s official documentation. Now create a blank app and run it in a simulator or device. The default start screen will appear on the simulator or device. Here, you may use the user interface of the Tipsi-stripe library because it supports all kinds of payment options viz. Google Pay, Apple Pay, etc.

Step 3: Integration Of The Tipsi-Stripe Library For The Generation Of Token

Install Tipsi-stripe package for integrating Stripe functionality into your React Native app. Now, set up your “Podfile” for the integration of appropriate pods in iOS apps, and then run “pod install”. Then set up the “Xcode” project and link the Tipsi-stripe package against your Xcode project. This will install all dependencies related to CocoaPods. Import the library in your app for the generation of the token. Now initialize it with the Stripe credentials which you will get from Stripe Dashboard. The Publishable key is used for generating tokens only. Now replace the Publishable key with your own key.
To generate the token, the ‘paymentRequestWithCardForm’ method can be used from the library. This method will open the card details Stripe form. The user will receive a token from Stripe after entering the card details in the above form.

Step 4: Creation Of Firebase Function Or Any Other Backend Server

For completing the payment, React Native developers can create a Firebase cloud function (or any other backend server) and execute it using REST calls from your app. This function will interact with the Stripe server and successfully complete the payment. The sub-steps involved in this process are as follows:
  • Create a Firebase project and cloud functions.
  • In the appinstall Firebase tools.
  • Connect your React Native development environment to the Firebase console.
  • Developing a Firebase function for making payment requests. This function accepts the request object from the app, then sends the request of payment to the Stripe server and returns the response from Stripe to the application.
  • Testing the Firebase Function internally using firebase serve, as external API calls are allowed by Firebase only for paid accounts.
  • Deploying Firebase Function to live server.

Step 5: Connecting The App With The Deployed Live Firebase Server And Completing The Payment

The final step involves making an HTTP call to the Firebase function and completing the payment request using the generated token. This is how payment processing takes place in the React Native apps using the Stripe gateway.

Concluding Lines

In this blog, we gained insights on the two important sections in Stripe payment processing- the frontend for the tokenization process and the backend for the payment requesting and completion. The Tipsi-stripe package is used for the frontend part and any server can be used for the backend part. We have gone through the significant steps involved in this process which will be very helpful for React Native development teams that aim at designing top-notch apps with a sleek payment processing feature.
If you too would like to integrate a popular payment gateway into a React Native app and lack technical expertise, seek professional assistance from Biz4Solutions, a competent React Native app development company in USA.