Top 10 Flutter App Development Tools that enhance Productivity!

Top 10 Flutter App Development Tools that enhance Productivity!
With millions of mobile apps in the market, software developers need to make choices before developing a new app. They may develop native, web, or hybrid apps. The development language and framework hold significance in application development. We are going to talk about one such app development framework, Flutter. Flutter comes with numerous advantages and has positively affected every aspect of application development. The Flutter community is growing at a rapid pace, with developers and designers rooting for it. This post explores the Flutter framework and discusses the top ten Flutter app development tools that play a crucial role in improving the developer’s productivity.

Why Use Flutter For App Development?

Flutter is used for Android and iOS mobile app development. It uses the same codebase for application development on different platforms. Even Google is known to have used Flutter in the development of different Google assistant modules. Many successful companies like eBay and Groupon also use it for developing uniform UI on different platforms. Flutter offers many advantages including:

1. Fast development

Code reusability enables the Flutter app developers to use one codebase for developing applications for mobile, web, and desktop applications. This saves time and fastens the development process.

2. Widgets-based technology

Custom widgets can be used to develop attractive UI with ease. This allows you to embrace uniformity in UI across the apps on different platforms.

3. Rich libraries

The Skia Graphics Library is a mature library that promotes fast loading and a smooth application experience.

4. Fast testing

Flutter comes with a hot reload feature that makes app development very fast. The developers can make changes in the app in real time and witness the change in the app. The all-widgets principle strongly advocates for the use of Flutter for application development.
Another positive aspect is the presence of numerous app development tools that streamline and fasten the application development process. Here is a list of 10 Flutter app development tools that every developer can benefit from.

10 Amazing Flutter App Development Tools
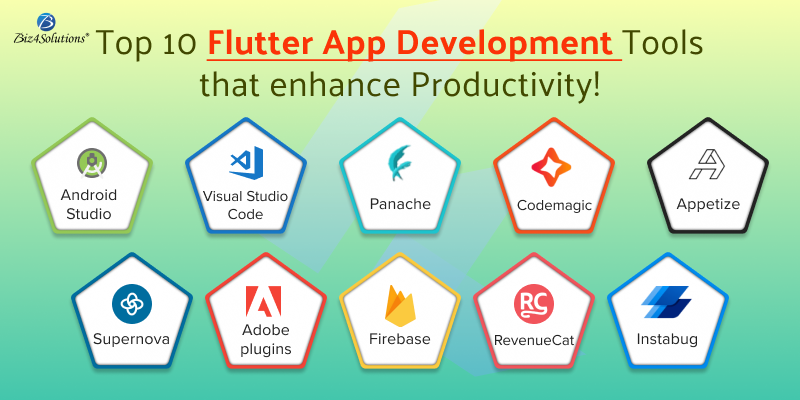
1. Android Studio

Android Studio is widely accepted as the official Integrated Development Environment for the Android operating system. Flutter app developers use it to productively develop apps on a large scale. An intelligent code editor, fast emulator, code templates, a wide range of testing tools and frameworks, widget editing support, and many code completion features make it one of the most popular Flutter app development tools. An app compiled using Android Studio can be easily published on the Google Play Store which is one of the main aims of getting into Flutter app development.

2. Visual Studio Code

Visual Studio Code or VS Code is an open-source trendy editor. Flutter developers can use JavaScript, Node.js, Python, and C++ to code in it. Some of the unique features such as IntelliSense, configurable color schemes, and customizable sidebar make it a worthwhile choice for Flutter app development. GIT control and debugging features are an added advantage. Its fast and lightweight feature is loved by the developers. Developers can easily integrate multiple third-party extensions to boost their productivity. Some of the successful companies such as CRED are using Visual Studio Code.

3. Panache

Panache tops the list of Flutter app development tools. It is an open-source Flutter material editor tool widely used to develop material-design-inspired themes and fonts. Using this tool, a developer can easily apply a theme, generate a theme file, set theme properties, and other things to create and implement attractive material themes. The large range of customization options is welcomed by the development community.

4. Codemagic

Codemagic is a Flutter-based CI/CD tool that simplifies the app development and debugging process, making the app market-ready. The entire process of build, testing, and release can be automated. Flutter developers can integrate it with any build tool to develop and test it. The automated code eliminates the need for any launch configuration. Codemagic achieves this aim by placing the Flutter app in the pipeline of mobile apps for the earliest market release. Codemagic is a popular tool for Flutter mobile app development which simplifies mobile application testing. Codemagic comes with a unique billing model that adapts to the need to save money and easy maintenance of infrastructure.

5. Appetize

The main website advertises ‘running the apps on browser’, which happens to be one of its key features. Appetize is one of the popular Flutter development tools used for Android and iOS apps on the browser. Appetize is unique amongst all the Flutter app development tools as it offers the option to run live app previews, provide training, provide live support for your mobile app, and automate testing, a summary of every component a Flutter developer would require for app development. The developers can use the tool without any extra plugins, downloads, or permission.

6. Supernova

Supernova is a design system platform used by developers and designers to develop collaborative web apps. The designers and developers can work in sync to design the system lifecycle. It connects DevOps and DesignOps. This Flutter development tool enables one to develop mature apps and easily scale the design system. Features like a design token manager, multi-brand design system, theme support, and component tracking dashboard, make it a one-stop destination for Flutter app development. Supernova also supports the designers in maintaining the design, enabling them to effortlessly design the app.

7. Adobe plugins

Flutter developers get to use a series of Adobe plugins that help them design Flutter apps and integrate different features such as voice interfaces and games. Designers are leveraging the functionalities of the creative cloud to use images and text as interactive and functional prototypes. Adobe XD is one of the most talked about plugins that enables developers to embed the design components into the app using .dart code. Any Flutter app development agency can help you identify the complete list of Adobe plugins that can be used for developing Flutter applications.

8. Firebase

Firebase is one of the most sought-after Flutter development tools. It has a wide range of hosted backed services including cloud storage, machine learning, and crash reporting. The Flutter developers can place all the Firebase APIs in one SDK which organizes the app development process. Organizations can hire Flutter app development services to get numerous benefits including cloud messaging, secure web hosting, and Machine Learning APIs. The app developers can use push notifications for target messaging to market themselves and retain customers.

9.RevenueCat

RevenueCat is a development tool that offers a powerful subscription backend without the need for backend code or server management. This sets RevenueCat aside from other Flutter app development tools. The Flutter developers can easily use the SDK to implement subscriptions and purchases in their apps. RevenueCat offers a wrapper around the billing in Apple Store and Google Play to simplify the integration of subscriptions and in-app purchases. You also get the dashboard to analyze different business metrics, and customer transaction histories, along with notifications for real-time events. RevenueCat can be a great tool for all organizations investing in apps with a revenue model based on in-app purchases and subscriptions.

10. Instabug

Instabug is one of the flutter development tools that help you manage the entire app development lifecycle. App performance monitoring, crash reporting, and bug reporting are some of its star features. Flutter developers also get the option to conduct surveys to get a better insight into user behavior and actions. Instabug is a great app development tool for large enterprise applications. It helps companies improve application performance with performance metrics and error prioritization. To summarize, this tool boosts app performance and scalability.

How to Choose the Best App Development Tool?

These factors can be taken into consideration while choosing a Flutter app development tool:
  • Usability: The tool must be easy to use and function the way the developers expect. It is best to take a trial of any tool before heading for application development.
  • Cost: Application development is a costly affair that involves licensing costs, infrastructure development costs, app deployment costs, and many other expenses. Evaluate the long-term and short-term costs of the tool to make sure it fits into your budget.
  • Lifecycle management: Lifecycle management includes an array of tasks such as testing, maintenance, data storage, and app deployment. It would be great to have an app development tool that contributes to lifecycle management.
  • Security: Check the Flutter app development tools for the in-built security controls to take care of governance and audibility.
  • Integration: The Flutter mobile app development tools should seamlessly integrate with the different services that will be used throughout the lifecycle of the application.
  • Expertise: Different app development tools demand different expertise. Go for flutter development tools that match the expertise of your app development resources.
  • Application: Rate the Flutter app development tools based on the application type which can be a native, hybrid, or any other type.

Conclusion

The Flutter ecosystem holds immense potential for application development. The Flutter app development tools further boost its authenticity in application development. Finalizing one tool for app development can be challenging. It would be a good idea to hire experts for the same. A Flutter app development company can suggest the best app development tool for your requirements and develop a robust app.

Flutter Performance Optimization Techniques & Best Practices

Flutter Performance Optimization Techniques & Best Practices
Flutter is a robust cross-platform framework used to build visually attractive and natively-compiled applications using a single codebase. With this framework, you can create solutions for the web, mobile, and desktop. Flutter delivers a native-like look and feel to apps on iOS as well as Android devices. Flutter comes with numerous other benefits like flexibility, app development speed, etc., and is loved by software development teams across the globe.
However, to achieve the best outcomes from this amazing framework, you must take care of a Flutter app’s performance tuning during the development process itself. A poorly optimized Flutter app is likely to be slow & unresponsive, consume more power, and require more time & resources during the development process. This will adversely affect the user experience, app store ratings, as well as the app owner’s budget. But, by implementing the right performance techniques & strategies you can develop a highly performant Flutter app that delivers a smooth UX. This post discusses the best practices to follow for Flutter performance optimization.

Best Practices for Flutter Performance Optimization

Use Widgets instead of Functions

Using Widgets instead of Functions is a key technique to optimize the performance of a Flutter application. While functions define the app’s behavior and manipulate data, Widgets are the UI building blocks app users interact with. So, if you use Widgets instead of Functions, your Flutter mobile app will have an interactive and visually attractive UI.
Here are some examples of how you can use Widgets instead of Functions in your Flutter application.

Custom Widget Creation

Developers usually define a function for generating a piece of UI. Well, there’s a better technique instead of this. Build a custom widget that encapsulates the user interface and its behavior. This method will allow you to reuse the widget in various portions of the app and your code will become more modular and maintainable.

Utilization of built-in Widgets

If you do not wish to create a custom Widget, you can choose from a huge variety of in-built widgets that the Flutter framework offers. You can develop complicated interfaces without having to write custom code if you utilize these built-in Widgets. Here are some examples. The TextField Widget helps you to create a text input field. The ListView Widget enables you to display a scrollable item list.

Combining Multiple Widgets

To create more complicated user interfaces, it’s advisable to combine multiple widgets. For example, you can use the Row or Column Widget for stacking or aligning several Widgets horizontally or vertically.

Breaking down Large Widgets into Sub-widgets

It’s a good practice to use stateless widgets wherever possible. During a state change, Flutter redraws stateful widgets. This means developers have to rebuild the entire widget. And, if the size of the build tree is large, you’ll need multiple resources to rebuild it. To address this issue, keep your widgets modular and small-sized for minimizing the size of the build function. So, break down large widgets into smaller-sized sub-widgets.
Using Widgets instead of Functions, your app UI will be more flexible and reusable. But, Functions are necessary to manipulate data and to define the app’s behavior. Therefore, the best practice followed by most experienced Flutter app Developers is using Functions alongside Widgets.

Optimize the Layout & Use “const” keywords

The complexity of a Futter application’s layout is one of the key factors that affect the app’s performance. So, avoid using nested layouts; use them only when necessary. Also, try to keep your widget tree as shallow as possible.
Using “const” keywords is a popular practice for optimizing Flutter app performance. While creating custom Widgets or using the in-built Flutter Widgets, use the “const” keywords wherever you can. This practice will make your widgets immutable. It will minimize the need for rebuilding widgets leading to improved performance. Here’s the reason! If you use “const,” the Flutter development environment will rebuild only the Widgets that need updation. There will be no change in the Widget when setState calls take place and widget rebuilding will not happen. Another recommended practice is saving CPU cycles and using them along with a “const” constructor.

Employ Asynchronous Programming Techniques

During Flutter app development, you must check whether the code is running synchronously or asynchronously. Using asynchronous programming techniques, you can avoid blocking the main thread and this will maintain the responsiveness of your Flutter application. But, it’s challenging to code a Flutter app asynchronously; tasks like upgradation and debugging become difficult to execute. To address this issue, use asynchronous programming techniques like “Futures,” “async/await,” etc. For example, using “async/await,” Flutter developers can write asynchronous code in a synchronous style which increases the code’s readability and maintainability.
Take a look at how to use “async/await” in Flutter:
Step#1
Using the “async” keyword define an asynchronous function before the function definition
Future fetch data() async {
// …
}
Step#2
Now, use the await keyword inside the asynchronous function to wait for the outcome of an asynchronous operation.
Future fetchData() async {
final response = await http.get(‘https://example.com/data’);
// …
}
Here, the function http.get() returns a Future. This represents an asynchronous operation that might take some time for completing. The keyword await enables the program to wait for the result of this operation before continuing.
Step#3
When you call the asynchronous function, use the await keyword to wait for the function to complete.
await fetchData();
The keyword await will enable the program to wait for the completion of the function fetchData() before it moves on to the next line of code.

Build & Render Frames in 16 ms

Creating and rendering frames in your app within 16ms is another common Flutter application performance optimization technique. The tasks of creating and rendering need two separate threads. For each of these tasks, you have 16ms. But, to avoid latency and boost the app’s performance, you need to bring down this 16ms to 8ms. This means, developing the frame within 8ms and rendering it within 8ms so that the total time doesn’t exceed 16ms.
To sum up, create and render the frames within 16ms in a 60 Hz display. Many of you might wonder whether lowering the time can hamper the display quality. The answer is “no.” Bringing down the total time of frame development & rendering to 16ms will not lead to any visibility difference. Rather, it will improve the device’s battery life and prevent thermal issues. Also, this approach will expedite the app performance considerably on smaller-sized devices. The animations of your Flutter app with be smooth and your users will experience a pleasurable UX.

Limit Opacity Use

Cut down the usage of the Opacity widget and Clipping to a bare minimum. When you use Opacity, it causes the widget to rebuild itself after each frame. This can hamper the performance of Flutter applications, and more so if animations are there. To avoid such a scenario, you can apply Opacity to an image directly, instead of using the Opacity widget. This will increase the task’s speed and reduce resource use.
The Opacity Widget allows you to hide another widget on the screen by wrapping it up inside it. So, many use the Opacity widget for hiding a particular widget. The practice of hiding a widget is common in programming languages like Objective-C. But, in Flutter, the approach of hiding a widget on screen for too long turns out to be an expensive affair. There’s a more cost-efficient substitute for this approach. You can rebuild the widget instead of hiding it using a methodology that allows you to reconstruct it without needing the Text widget. And, if you wish to display that widget on the screen you can use the Visibility widget instead of Opacity. It does not involve any fractional opacity values. Visibility has two states- either visible or invisible.

Reduce the App Size

Development teams often end up using multiple packages, codes, widgets, and scripts during the app development process. However, storing such a humongous amount of data can be detrimental to the app’s performance as it consumes high memory.
This issue can be resolved by using the tool called Gradle. This tool helps you to reduce the app’s size. You can also use the Google-introduced packaging system for this purpose. This packaging system allows you to build Android app bundles. With app bundles, you can download the original code from Google Play Store. Here, you’ll find apps that are compatible with the platform architecture and the device.

Minimize Network Requests

The number of network requests can affect your Flutter app’s performance. So, try to reduce network requests as much as you can. You can use caching mechanisms such as StreamBuilder or FutureBuilder for avoiding repeated network requests.

Use Effective Data Structures

Avoid using huge data structures such as maps or lists, when you need to handle large chunks of data in your Flutter application. Instead, consider using efficient data structures such as LinkedHashMap or Set. These data structures fare way better in terms of performance and memory usage.

Optimize Images

Images can turn out to be sources of performance woes, particularly if they are huge-sized and are not properly optimized. Hence, compress images and size them properly. For this, you can utilize tools like “flutter_svg.” This tool helps you to render graphics instead of rasterized images.

Utilize Flutter Performance Tools

Flutter comes with multiple performance optimization tools. These tools enable Flutter app developers to examine and boost the performance of a Flutter application. For instance, the Flutter DevTools allows you to analyze and visualize the performance of your app based on metrics like CPU utilization, memory usage, frame rate, etc.

Carry out App Profiling

Flutter performance testing is vital. So, profile your Flutter app at regular intervals for identifying performance issues in the Dart code. Some examples of such issues are i/o, bandwidth, the lack of stuttering, etc. Fix the issues at the earliest. Tools like Flutter Observatory will help you to identify costly operations and optimize them.

Closing Thoughts:

It is important to optimize your Flutter app for performance. An optimized Flutter app ensures device compatibility, provides a great UX, conserves battery life, minimizes app development costs, and improves app store rankings. The aforementioned Flutter performance optimization techniques are the best-known practices trusted by countless developers worldwide. So, partner with a professional and experienced Flutter app development company. A proficient firm will execute your project following the best practices and smart strategies to deliver you a highly performant Flutter end product.