The Minimum Viable Product (MVP) is a product offering that has been designed to solve a specific customer need. An MVP can be any size, from a simple whiteboard sketch or website to an entire application with multiple features and analytics. Your goal should be to create an MVP as quickly as possible – so you can test whether your initial mobile app development idea works before spending additional resources developing something that won’t sell well. Planning an MVP requires validating your first product offering at every stage of the way.
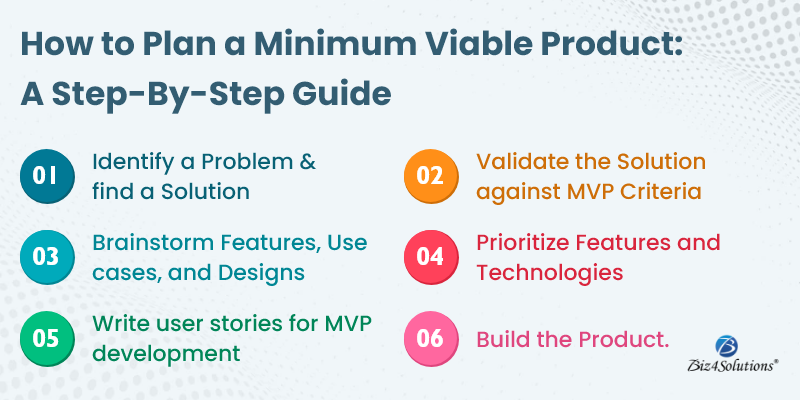
Start with a problem to solve
This is the most important thing you can do when planning your MVP. If you don’t have a problem, then there’s no reason to build an MVP. You need to start your project by identifying and solving some sort of issue or pain point in the marketplace that will benefit from being addressed by your product. There are many ways of doing this; here are just a few ideas:
- How can we make our lives easier?
- What problems do people currently face?
- What new ideas would be exciting for consumers if given more attention and care?
Solve the problem with a solution
The first step in planning your MVP is to define the problem you’re trying to solve. You need to know what it is, but more importantly, why it needs solving. This can be difficult if you’re not familiar with the industry or product space—but don’t be afraid! This outcome can be achieved by asking these questions: “What do users expect from the product?” “How could we improve upon our current offering?” and “What else could we offer?”
Once you’ve identified what’s wrong with an existing solution and how that problem can be solved by building something new (or improved), then it’s time for brainstorming about potential solutions. Write down everything that comes into mind as soon as possible so that later on when looking at all these ideas together again there won’t be any gaps between them because they were written down separately earlier than other ones instead of being combined into one big list right away.
Check your solution against the criteria for a minimum viable product
You should now have a rough idea of what your mobile app development solution looks like and how you plan to get there. But before going any further, make sure it meets the criteria for a minimum viable product (MVP).
- It’s simple enough that anyone can use it without getting into trouble or wasting time.
- It doesn’t cost much money or require special equipment—you only need an internet connection and access to code repositories such as GitHub and GitLab where the source code is stored online so others can download it if they want to contribute their own improvements later on down the road (see below).
- You can run multiple instances of this application on one machine which means multiple users can use it simultaneously without affecting each other’s performance too much; also called scalability! This means more people = better value proposition = higher ROI = more sales potential…and so on until we reach infinity!
Work backward from that Solution, starting with Personas, Features, and the Design
In this section, you’ll work backward from that solution: starting with personas, features, and the design.
Your product’s persona is a fictional representation of your target audience. It’s like a character in a play or movie who represents how people think, feel and behave when they use your product. Personas help guide you through the rest of the mobile app development process by helping you understand what problems people have with existing solutions and how those could be solved by using yours instead.
A user story is simply an anecdote describing one aspect of a feature (e.g., “I want to be able to save my favorite photos from Instagram”). It can also include user pain points if necessary—for example, perhaps someone has been trying unsuccessfully for days just so they’ll finally have enough space on their phone for new content without deleting everything else first!
Brainstorm features, use cases, and designs
This step is a great way to get your creative juices flowing. It’s important to start with a high-level overview of what you want the product to be able to do for users—and then flesh out those ideas into more specific goals. If you have an idea in mind but aren’t sure how it would work out on paper or screen (or if there are any technical challenges), try asking yourself these questions:
- What problem am I trying to solve?
- Why am I solving this problem?
- Who is going to use this product?
- How will they use this product (e.g., as part of their daily routine)?
Prioritize features and technologies
This is a simple exercise that will help you prioritize the features and technologies that are most important for your MVP.
- Prioritize features by importance: The most important feature to include in your MVP should be something that will help you achieve your goals, such as getting users’ feedback or testing a new product idea.
- Prioritize features by the effort required: Some technologies are easier or faster than others, so it’s important not only to identify which technologies are most valuable but also how easy they are to implement within your budget constraints.
- Prioritize features by how much they help you achieve your business goals: You can also use this technique when determining whether or not each feature should be included in the project at all—for example, if one of its primary functions is simply making sales happen faster (ease-of-use) instead of helping users solve problems (value).
Write user stories for MVP development
User stories are a way to describe the problem you want to solve. They should not be written from your perspective, but rather from the user’s perspective. This means that they should be written in an active voice and in the present tense (e.g., “The users will be able to see their social media feed”).
These user stories can then be broken down into smaller chunks that serve as milestones for MVP development—for example:
- The first iteration of this feature will allow users to create new posts on Facebook and Twitter accounts from within their app or website;
- The second iteration will allow them to upload photos from their phone camera; and so on…
Build the product
Now that you’ve got your MVP, it’s time to build the product.
Your first step is to build out a skeleton of what your final product will look like. This will help you test and iterate on your idea as you go along. So, make sure that when you’re building this version of the product, it’s something that can be easily understood by others in its current form (and also doesn’t need any major changes before launch).
Once this step is complete and everything looks right, then move on to testing it with potential users—and don’t forget about marketing!
Planning an MVP requires validating your first product offering at every stage of the way.
In order to validate your product at every stage of the way, you must first know whom you’re building it for. This means asking yourself questions like:
- Who will use this?
- Why do they need it?
- How much does this cost me, my company, and/or the customer (or user)?
Conclusion
I hope you’ve learned a lot about the basics of planning an MVP. Planning is a process that involves validating assumptions, exaggerating them for test purposes, and then reversing course if necessary. The more you plan your MVP, the easier it will be to execute on time and budget.
If you want to turn your ideas into reality you just need to brainstorm your future MVP product features and choose a competent software development company for building your MVP.